the body plan fro the small eaglethe eagle head laid out on a block of pinethe head glued in place, and faired to the body plancarving has started with taking the background down below the eagle.partially carved small eaglecarving completed. I was not pleased with the lip I had left around the ground so I removed it.
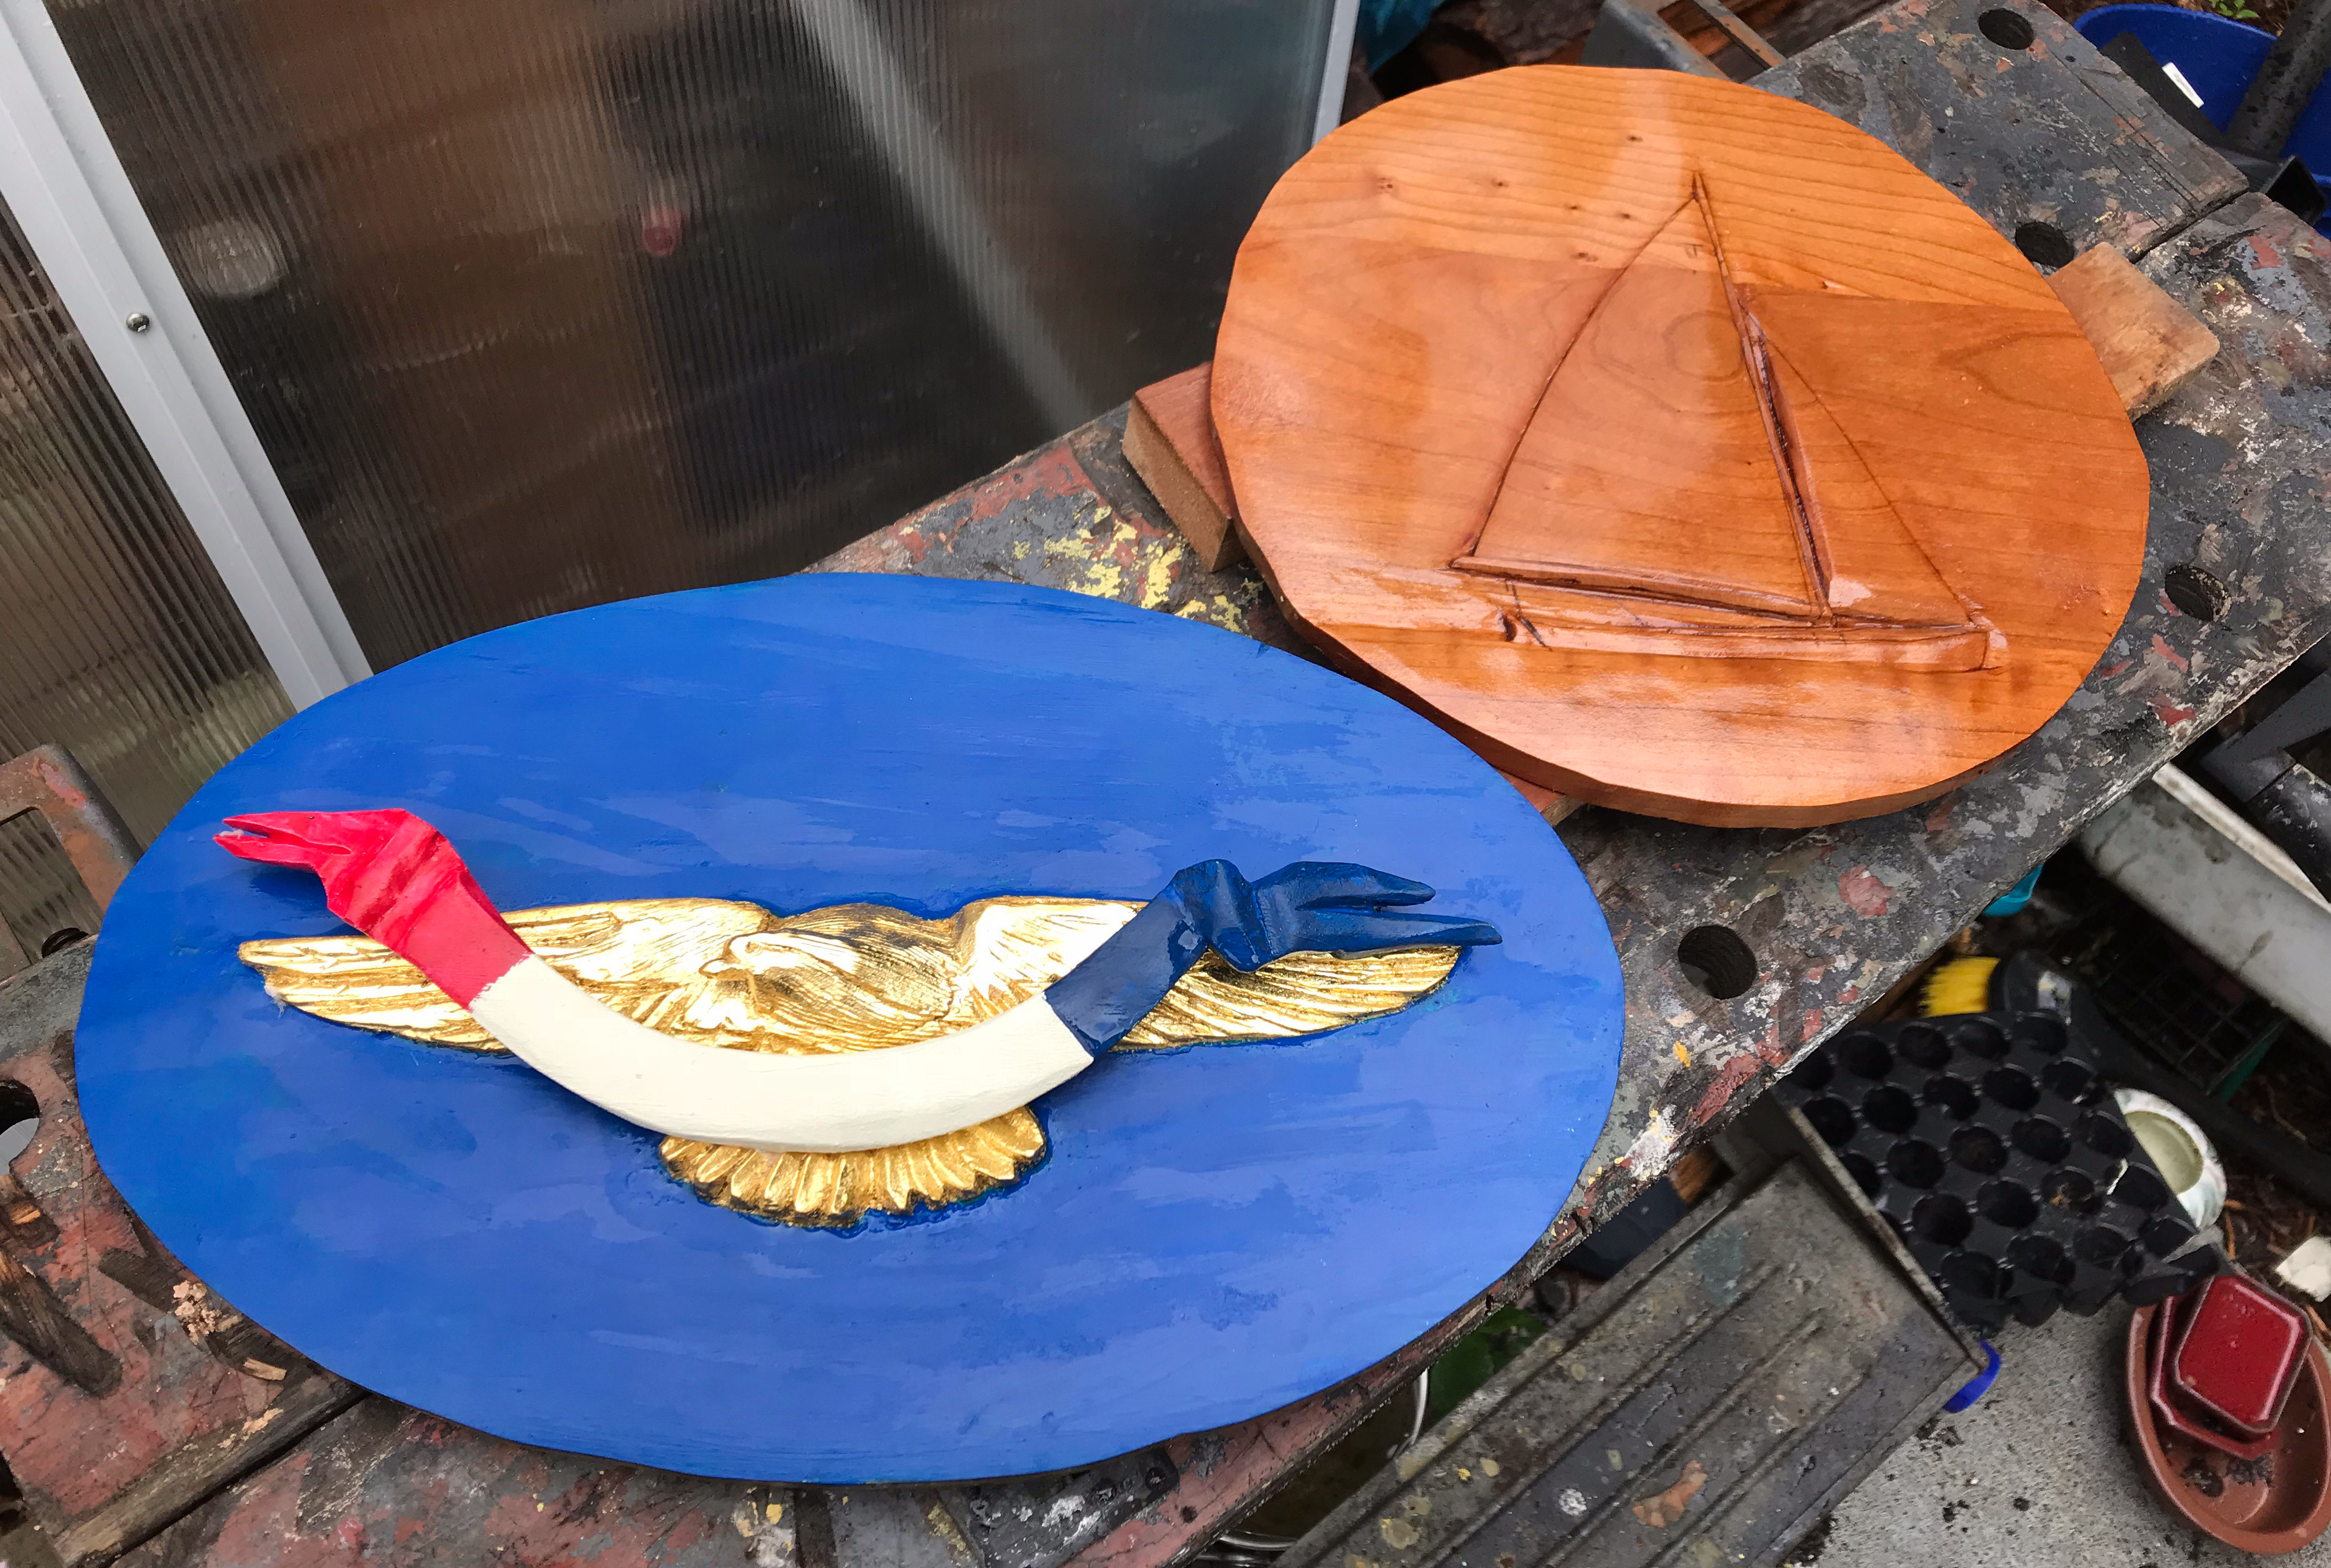
This eagle is barely eleven inches wide, not my smallest, but diminutive none the less. It’s a good miniature project for a woodcarver. Pine is great wood, but fine detail in small sizes are not its strong suit. Would this pop out at you in cherry, plum or box? Sure, but my objective was to do what was possible with a butt end from a #3 common plank. A piece of kindling in other words. Why, just because it was the middle of summer and I needed something to do while larger projects developed. Like my 19th century antecedents, I created my design from pattern elements used in other projects. I then altered them to make a plan I liked. This method of work from patterns was traditional. Patterns adorn the walls of my shop, as they do in small boat shops. If you are good at drawing feel free to do so, but the advantage of patterns is having a good record if you need to duplicate work. Patterns are also handy if you need to make alterations in a design.
The photos show the method of carving through to completion; except the gilding. I gold leaf but acknowledge that I am not a gilder. I’ll do leafing for customers, but I feel ambivalent about the effect of gold leaf. Under most lighting conditions leafing washes out the fine details. But, so many love to see a gilded eagle that presenting one without it almost automatically invites the question “why didn’t you gold leaf it?” I’ll cover this in more detail later in other posts. For now, I’ll say that I’d rather leave an eagle varnished, or tinted with bronze.
If you enlarge the first photo you’ll see the defects in of pine I am using. I once had a student who got mad at me because I didn’t carve everything in the very best quartersawn stock. he also refused to believe me when I told him that White Pine had been the preferred wood for most figureheads carved in the northeast. It’s too soft and prone towards rot he proclaimed. I suggested that he research the issue, but he departed my class in a huff when he discovered that basswood was not my favorite carving wood. I wasn’t being perverse. Patterns, molds and carving blanks come to a shop from boatbuilders with imperfections. Normally they understand the needs of the carver for clear stock, but not always. Of course, you send back anything that’s too awful to work, but life is not perfect and even a hobbyist needs to learn to work with imperfection.
The important thing to learn from the first photo is this: we get rid of those knots before carving, but their effects on the grain persist just like water currents around reefs influence our path through the water. We have to learn to compensate in order to make something beautiful. The same as in our daily lives.
Those of you familiar with the U.S.S Constitution may recognize the featured photo as one of the boarding planks on the Constitution. It’s been a frequently carved design for me since I first saw it, and I’ve used it to grace chest and box tops over the years. Despite being an intricate design, it is not a hard carving project. If you’ve read some of my other posts, you know that I plunder designs. I love to alter things, pull elements out of context, and place them in new settings. It’s a common technique for artisans and artists. The boarding plank design’s most salient feature, for me, was the head.
Boarding plank carving on the USS Constitution.
At some time in the ’90s, a client wanted something carved on the end of a tiller; the usual Turk’s Head knot was not what he wanted. I plundered the boarding plank for the design, and the client sailed away very pleased. Here is the prototype for the tiller head:
Later, I again used the head for some quickly carved walking stick heads. Never meant to be fully featured carvings the stick heads were “sketches” that I could carve and sell as I worked. They sold well at boat shows.
Usable design elements are in plain sight within other designs. Plunder away!
I once decided to carve ten eagles from variations on the same basic pattern. The 18th and nineteenth-century carvers had done it. Look at the repetitive poses of young women or men carved as graceful additions to ships bows. Eagles also seem to fall into family groups. Shipscarver’s knew the knack of altering arm or leg positions, changing a collar, or a gown to something more 1860 than 1850. Who was I to pretend to know more than my masters? I began with a photo of my favorite eagle at Mystic Seaport. The transom eagle from the first U.S.S Pennsylvania. I enlarged it to a size that I could use as a pattern, and from there, set about a two-year-long excursion into variations on themes.
In my first iteration, I found myself channeling a bit of McIntire as I played with the head . However, I checked myself short of going the McIntire serpentine neck route. I carved this one in a lovely piece of sugar pine, and the closeness of the grain allowed me excellent control of the tools. The movement in the legs of this eagle permited me to create a real sense of depth and movement in a piece of wood that was not that thick.
In the middle of the cycle of ten eagles, I channeled a very tiny bit of Bellamy with the head, neck, shelving of the upper wing, and banner. Anyone knowing Bellamy’s work though will recognize that he was an influence on my approach without any attempt to copy his style. It was just fun to acknowledge the master without imitating him. Made out of white pine, I gilded the piece, which I usually do only at client request.
Eagle based on the transom eagle for the first USS Pennsylvania
The final eagle was a bit more architectural in approach. The head looks downward, and the body seems to be marching forward under a canopy of threatening wings. The wings were hollowed, to giving the eagle an aggressive look. Carved from thick local Massachusetts pine, I had a piece of wood that could take bold carving. Preparatory to gilding, I thinly painted with bronze paint. I liked the semi-transparent effect so well that I’ve left it that way.
Boat shops are full of patterns with notes and measurements on how to alter the boat to desired length breadth or other features. The old-time carvers most likely did the same.
The great martial artist Miyamoto Musashi said that from one thing, we could learn a thousand things. Mix things up. Learn something new from something old.
I remember being dismayed when Warburton, my mentor in Baltimore informed me that the elaborate carvings of Grinling Gibbons were composed in pieces and then joined together. I believe that I spotted a gleam of pleasure in his eye at my discomfiture. From my limited understanding of carving in those days, it seemed that anything carved from a whole piece was best. Later that day, I assisted him in selecting stock to glue up for a large carving. , I learned that frequently it was neither possible nor preferable to make something in one piece.
The nineteenth-century carvers of show figures and figureheads knew this. Whole logs seem to be a great place to start when working on a large piece. But, the radial splitting of the wood as it moves can begin the process of destroying the figure in the harsh marine environment. Then too, extended arms or legs posed problems. With the single large block, you become constrained to what you can include in that volume. My first eagle proved the point to me. I had a rectangular piece of Cuban mahogany; Now I might recut the block, and reassembled the pieces to get a more fluid design. But, I was at the very start of things and designed the bird within the block. As a result, the carving appeared to be in a straitjacket. Eventually, you either learn these lessons through mistakes or by observing your masters work. I always was a kind of bull-headed sort.
This doesn’t mean that joining pieces together is easy. Old figureheads were held together with “drifts” of iron, bolts, pegs, glue, and careful joinery. I believe that the Penobscot Bay Maritime museum has some x-rays on display that show the impressive ironwork hidden inside some of their figureheads. I’ve used wooden pegs, glue and the odd lag bolt to secure heads and wings on some of my work. I liked the way John Haly Bellamy used to build the “top shelf” on the wings of his eagles. I emulate that not by starting with a thicker plank but by gluing up that section of the blank in several layers. I like the look of drama and movement it gives the birdie. Like Bellamy and Samuel McIntire, I’ve been known to exaggerate the eagle’s neck. This approach makes the head look serpentine. The head needs to be carved apart from the body and added as the carving progresses. On larger eagles, I’ve drilled and countersunk a spot for a screw or peg and then glued and clamped the head in place. I word about style here. I don’t carve naturalistic wildlife. I carve stylized eagles that reflect the design preference of the 18th and 19th-century masters I admire. Much of my technique won’t serve a carver doing more naturally styled birds. But, back to bits and pieces. The massive eagle on the wall of the Whaling Museum in New Bedford was assembled from many parts. It was the only practical way to create it. Part of the reason that you can make out the individual parts is that, as you probably already know, wood continues to expand and contract. Being that this eagle has taken lots of weathering those seams started to show.
Searching the Internet, I am sure you’ll find lots of advice on how to and not to assemble blanks for larger carving. I like to use wood of the same species, air-dried if possible, and matched closely for moisture levels. When I first began doing this, I used epoxy, but stopped when I realized that I was getting excessive squeeze out on the glue lines, and as a result, winding up with starved joins ( joins between pieces that lacked enough glue to get excellent adhesion). Starved joins will lead to failures in the blank sooner or later, and the general rule is that they’ll tend to be where you can’t fix them. Remember: a good glue joint is stronger than the surrounding wood. Depending upon how wet the piece might get in regular use you have a variety of glue choices from resorcinol glues to polyvinyl acetate glues like Titebond II. A certain amount of squeeze out is both expected and wanted. Don’t be excessive in your glue application, but do apply glue evenly, so you avoid starving the join. If you have spent any time within a boat shop, you may have noticed the large racks of clamps. That’s due to that general law of boatbuilding that you always need one more clamp than you have. Carvers have the same issue when gluing up large or irregular blocks. Be prepared to have a few more bar clamps, C-clamps and such more than you think you might need. Remember to use backing shims between your clamp and the blank to avoid damage to the surface of the blank. Here is a nasty little dirty secret: I have been known to draw pieces together temporarily during glue-up by using screws to pull pieces together or to hold something in place until it’s dry and cured. You can’t use this where the defect you create will be visible on a carving finished bright with varnish. But, it works great when the visible defect will be carved away or when the piece will be painted. Always leave a glued up project in a dry, warm area. Always leave everything clamped together a minimum of twenty-four hours. After taking your clamps off, leave the assembled blank to “cure” for a couple of days before carving. Have fun getting beyond the basic block piece by piece.
The join between the pieces of the blank was glue starved.
Pilothouse eagle ishowing the ironworkk securing the eagle together.
Unless you have strict deadlines hanging over you project completion becomes a flexible goal. The little eagle in the picture was started at the end of June as a demonstration of carving in very sub-optimal wood. It should have been completed weeks ago, but work on gilding was held up while I waited for a period when I could gild without large amounts of dust ruining the gold leaf. On the other hand, the little Town Class sloop is handily racing towards early completion. It’s destined to be a Christmas present and will be done as soon as I sand and varnish the mast hoop that it is going to be mounted in.
In the machine shop, there is a large bucket of spoon and spatula blanks that have been roughly carved, and are now waiting for finishing. I finished the blanks in August. They are what made the carving shop unsuitable for gilding. The bench in the machine shop is covered with cherry planks destined for a large ship portrait (an 1880’s era composite steam/ sail vessel). I have to finish jointing the boards and make final decisions on the arrangements of the planks before gluing up the blank. To ensure that blanks are stable and won’t split open after carving they have to cure for a few weeks before I start carving. So while I am very excited about the project I know that I won’t start it till January. More likely to see early completion are a few blanks destined for portraits of small catboats that I hope to take to a winter show.
So completion gets to be an elastic phenomenon. Clients complicate this elasticity; they want their portrait in time for an anniversary, birthday or before launching so the new quarter boards, billet head or transom eagle can be installed. The carver, boatbuilder or other craftsperson learn to plan. Eisenhower said that: “in preparing for battle I have always found that plans are useless, but planning is indispensable.” Although he never worked in a boatyard or carvers shop he had it right. You spend time planning, but admit that strict plans don’t always work well in small craft shops. That’s why there is that large rick of planks in the rafters – just in case. That’s why you have models, templates and notes on practice pieces for all your projects – in case you have to do it again.
Plans are certain to go awry: the wood needed is hard to find in local yards, the gilding has to wait, the paint or varnish is dry, but not cured, so, we have to wait. Most importantly to the company’s cash flow – The deposit has not been paid so now everything has to wait.
The eagle presented here was a commission. It’s an all-time favorite design that I first carved in the 1970’s when I saw Jay Hanna’s take on this classic 19th-century carving trope.
After carving four or five variations on Hanna’s redesign of the classic, I moved on to other designs. About twenty years ago a client saw a photo of my first effort at Hanna’s eagle in my scrapbook. He decided that it would be the perfect launching gift for a boat his friends were building. After settling on a price, deposit and timeline I went hunting for the wood. Although I love to carve in New England white pine, I opted to do this eagle in Western sugar pine. It is not too easy these days to get good quality sugar pine, but I was fortunate in finding a short piece locally that was just what I needed. Western sugar pine has an enticing odor when carved, but mostly I love it for its straight grain and ability to take and hold fine detail. The photos show the progression of the project from pattern through gilding. Although this is a small eagle, meant for a cabin interior, the underlying essentials are the same for most relief eagles in which the head and banner are not separately added pieces. And…yes it is true; on eagles like this, I do carve the head first so the eagle can watch what I do. So far I haven’t been bitten.
Medora turned out to be a game changer for me. Okay, this is where it gets weird. One night after finishing the carving I dreamt that I was in my favorite coffee house in New York City ( Cafe Rienzi). Seated with me was the famous carver John Haley Bellamy and my favorite painter Salvador Dali. Dali and Bellamy were pointing out that many things took on compelling interest when pulled out of proportion. Bellamy looked at me and pointed out that the wings on his eagles were exaggerated for precisely this reason. Dali smiled and agreed.
After waking up, I thought lots about that dream. Since then I’ve always added a bit more length to my eagle wings.
I heartily recommend to you Jay Hanna’s book on marine woodcarving: The Ship Carver’s Handbook, as well as anything you can find on John Haley Bellamy and Salvador Dali! Carving the eagle head first, and ghostly conversations with dead artists remain strictly optional.
You must be logged in to post a comment.