Balance

It’s that time of year when I must produce. Whether for a show, to rebuild inventory, or finish pieces held in shop Limbo by my obstinacy about completing pieces I am not a hundred percent happy with.

There is also a conflict with the day job, which suddenly gets busy. So, when I should be in the shop, I run out at night to cover an event or a meeting. So, I feel guilty about the three new projects I’ve also been determined to create, which have the wood selected, and the design completed, but no forward progress from me.

Completing and selling projects is good. The end is about payment after the creative whims have been satisfied. And there is a certain gleam in your eye as you count money. After all, it pays to keep the lights on and acts as a stimulus for creativity. So old projects go on to new homes, and new projects form on the bench.

I am unsure which end of the equation is most satisfying—the joy of the creation or the pleasure of the payment.
Actually, I think it’s important to balance them. Too much emphasis on the creation, and you can’t bear to part with a piece. Too much reliance on the payment, and you become a factory watching how many pieces you can move a day.

Ash

This is the time of year I am busy stacking firewood and preparing balks of wood for future use as cutting boards, and bowls. This fall, I am particularly busy preparing bowl and cutting board stock from a supply of ash that came my way. I precut the balks to my preferred size, measure the moisture content ( most of these are about 14 percent), paint the ends to reduce checking, and carefully store the wood to allow plenty of air circulation. I’ll periodically check the moisture over the following months. I won’t start serious work with them until they are at about seven percent moisture. When the humidity is proper, I’ll resaw the wood meant for cutting boards to about an inch in thickness and let it set for a while, as it loses additional moisture exposed by resawing the wood. After that, I’ll plane it to about 3/4 of an inch, joint straight edges, and glue up blanks for the cutting boards. After the blanks are prepared, I’ll let them proof for a few weeks before carving and finishing. I’ve found that this final proofing reveals weaknesses in the glue-up before it becomes someone’s property. Failure in use is something I work hard to avoid.

Remember, the wood I am using comes to me reasonably green. It’s not kiln-dried stock from the lumber yard.

Bowls are a bit different. I’ll start working them like cutting boards at about seven percent moisture. My first job is to joint the edges straight so I can glue up a wider blank for the bowl. I prepare several blanks at a time and wait several days before I begin rough shaping the contours of the bowl. Next, hollowing gets done with gouges. After rough shaping with the gouges, I’ll gradually reduce the inner bowl to a smooth surface with electric sanders and old-fashioned card scrapers. The final sanding is by hand. Which finish I’ll use varies; mineral oil, tung oil, or a food-safe varnish. Each finish has advantages and issues. And sometimes, the choice comes down to aesthetics, which brings out the beauty of the wood best.

Ash has become an on-again and off-again item in the shop in recent years. The emerald ash borer has destroyed much of the ash in New England, and what I get comes from salvage cuttings. Someday I expect that ash will be like chestnut before it, a rare and precious visitor to the carvers bench.

This is sad when you consider the many uses of ash in furniture making, basketry, structural timber, musical instruments, turning, flooring, and marine uses. As a carver, I was introduced to it through commissions to carve eagle heads on the ends of long ash tiller handles.

Another part of the tragedy the emerald ash borer brings is the inevitable decline of the environment where it grew. Species dependent on it suffer because their habitat shrinks. I have included a photo below of a piece of ash firewood. The picture shows the tracks of the borer on the wood.

I’ll be thinking about the implications to the environment, craft, industry, and aesthetics as I work this batch of wood.

Paper and Scissors

I found the wood sitting in the shorts at my favorite hardwood dealer. It was very dark, heavy, and dense. It was mahogany but so dark and heavy that I felt it was a wayward piece of Dominican, not Honduran. It was just what I wanted.
I wanted to create a banner with a distinctive font, Barnhard Modern. I also wanted to give the banner a center and ends that undulate. The result was pleasing. At shows, people run their hands over the banner as a sensual experience, precisely what I wanted.

How do you do this? You must carve banner ends to appear delicate when viewed from a distance. But up close, there needs to be enough heft that they’ll stand up to the abuse they’ll get on a boat’s transom. For a show display, you have to compromise. People are way closer to the carving than they would be in another boat.

Many banners have curvature, but in most, the area which is lettered is flat. On MANDALAY, the field of the lettering undulates. So, the lettering does not stay in the same plane while laying it out or carving it. To experiment with this, I advise using wood no less than 8/4 in thickness. Any less will be too thin for the effect to work.

First, I carved the banner with all its curves and undulations. It’s essential to control your pleasure in removing wood. Easy. Remember that the effect comes from the smoothness of the curves and contours. Abrupt changes will ruin the look. Periodically take a break to place it in natural light. Turn it upside down and see if the movement of the wood flows.
For lettering, you have several options: Old School layout by hand; or New School computer layout in vinyl or paper. I chose a compromise between hand layout and computer layout on paper. The key to the paper template here is that the paper is flat, and the surface is not – hence the title: Paper & Scissors because cutting the paper will allow you to follow the undulating surface.
To follow the undulations, you slice the areas between the letters to get them to lay in the correct planes. As you layout, you also need to adjust the kerning ( distance between the letters). When completed, take the design into natural light, turn it upside down, and check to see if it still looks proportionate and balanced. I left this for a day and returned to it fresh the next morning; rested eyes see mistakes. I also find that taking photos on my phone reveals things my eyes sometimes miss.

After the layout was complete, the letter carving was like any other letter carving project. The finish is about eleven coats of Captain’s Z-Spar rubbed out after the first three priming coats and each succeeding one. The lettering I painted with One-Shot yellow sign paint. Two thin coats are better than a single thick covering.

Although gold leafing is an entirely separate topic, I advise that you do yourself an enormous favor and allow the varnish to cure before gold leafing. Remember that’s cure, not dry. Varnish manufacturers will tell you that varnish dries in twenty-four hours. But that is not the same as curing.

Gold leaf has a nasty tendency to stick to anything. But especially uncured varnish. I frequently allow a week or more for the varnish to cure; move on to another project, and come back later to apply gold leaf.

Forgotten Tools

Principal carving is complete, finishing the coaming and adding some details are all that's left before fitting into the hoop

Every craft has a few tools that seem so insignificant and ordinary that we pass over them when discussing how we work. Three that I can’t do without are a simple glove with the fingers cut off, my mallets – a large lignum Vitae one for heavy work, and a little palm job for the delicate touch – the final on this short list is a palm pad filled with a shock-absorbing jell.
These are indispensable next to sharp tools, yet they barely receive a mention in handbooks on carving.


The glove keeps your hand from getting abraded while removing the bulk of the background in a carving – sometimes called wasting the background. Remove a significant amount of wood manually without this, and the most minor damage you’ll have are abrasions and scratches from the wood. Splinters are, of course, an issue that the glove helps you avoid.
The shock pad will protect the palm of your hand from injury caused by regularly propelling the tool into the wood. Depending on how sensitive your hands are, you could be talking about carpal tunnel syndrome, tendonitis, or merely a sore hand.
Whenever you remove a significant amount of wood, using a mallet is a great idea. Carvers mallets are rounded and come in a wide variety of sizes, weights, and wood species. I have about five, but my favorite is the little palm mallet made from a piece of firewood elm. It fits my hand perfectly and is light enough to allow a bit of finesse in hitting the tool.

If you carve and don’t have these tools, you should acquire them – they are cheap and make your carving safer and easier.

Thoughts on Wood – Pine

This post dates to this week two years ago. I’ve added just one or two additional comments that reflect how my thoughts are developing:

A professional carver who gives internet lessons on carving commented online to a student that pine was not a suitable wood for carving, get some good basswood was the advice. I laughed at this. Pine was the go-to wood for several generations of New England ship carvers, and the lines of many a schooner’s hull were carved first as half hull models out of our regional white pine, not to mention figureheads and much of the work of John Haley Bellamy. 
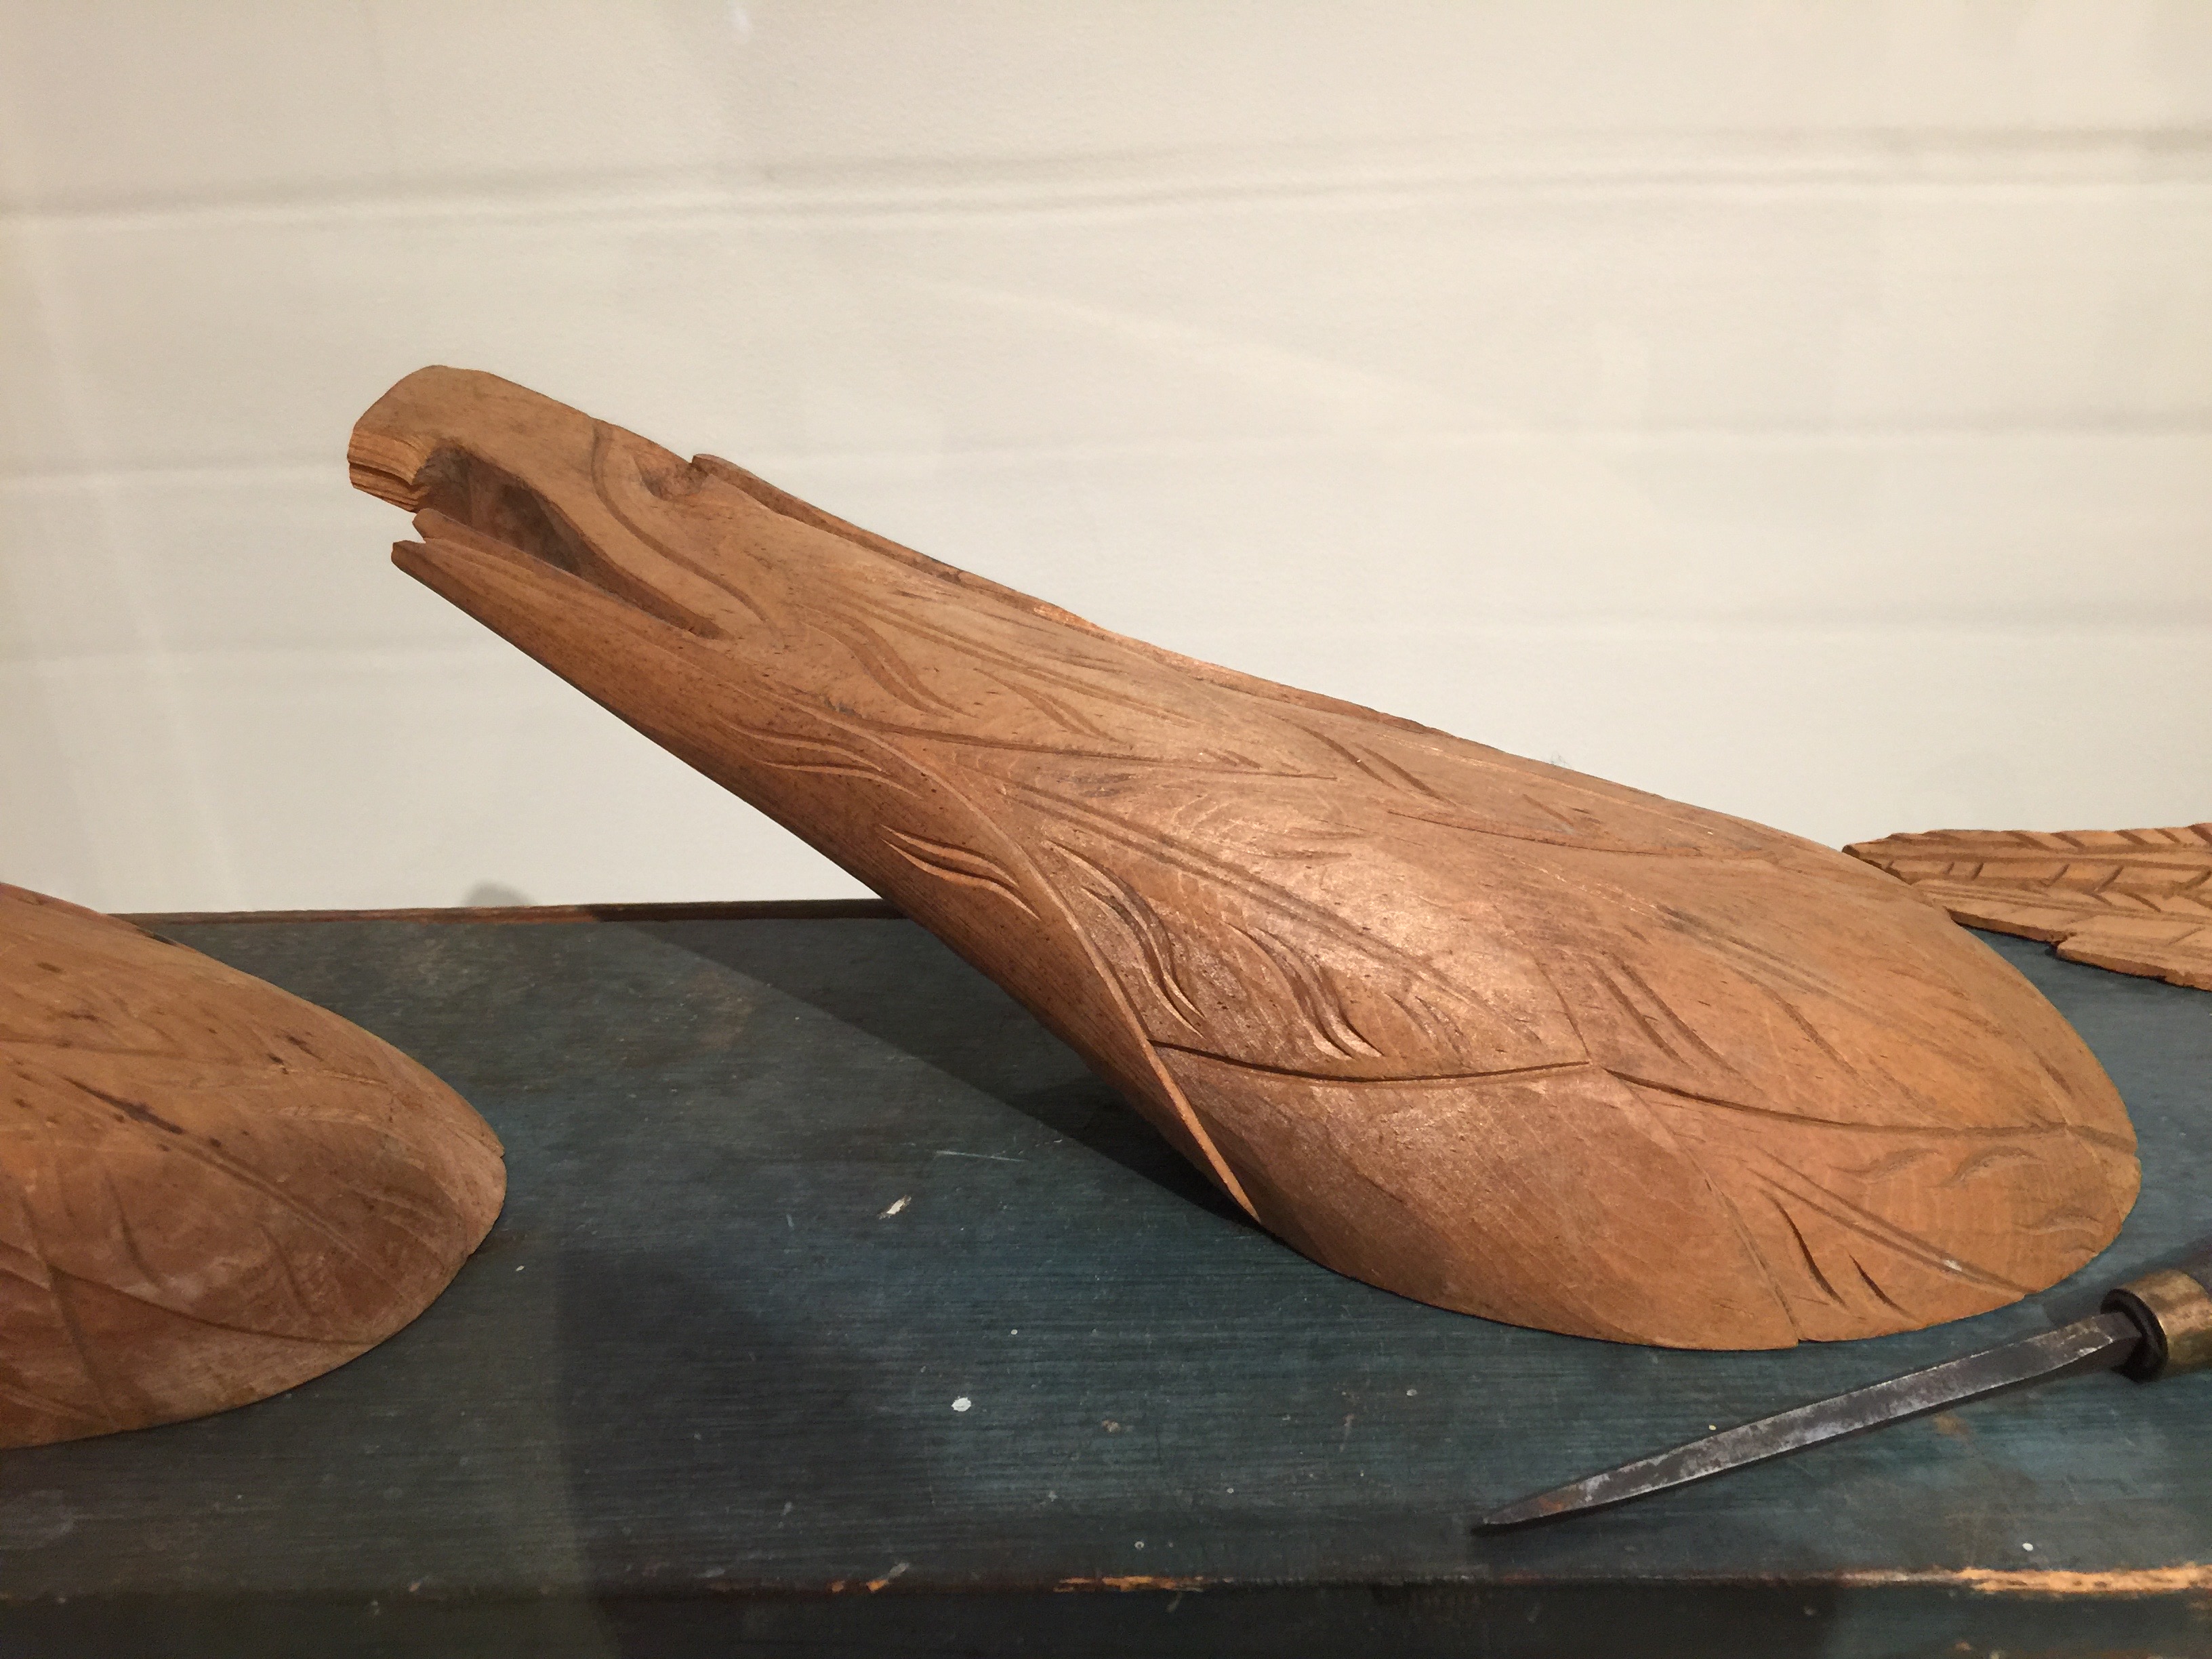
Pine is terrific to carve is you are mindful of its character and use sharp tools.

Here is a pine paradox: southern yellow pine can be harder than many hardwoods, and was once widely used for pattern making and shipbuilding. In the ’70’s I was gifted with a section of southern yellow pine that had been a beam in an old factory. Cutting it up into carvable pieces was challenging. In that case, the sample was old-growth cut in the 1890s.

Regional variation, the environment in which the tree grew, how the sawyer cut it ( quarter sawn or plain), how fast it grew, how it was seasoned, and other factors all contribute to suitability for carving. For example, the transom eagle on the USS Constitution is ponderosa pine. These days ponderosa is better known for its use as structural wood and not for its use in carving. In 1910 the old-growth ponderosa selected by a Philadelphia shipyard carver was not exceptional. The ponderosa chosen was sturdy, hard for a “softwood” and tight-grained. Until the Constitution maintenance shop carpenter told me about the carving as he worked on it, I’d never have thought to select ponderosa for a project.

This Transom eagle on the USS Constitution was carved in 1901 from Ponderosa pine. At some point it was modified to allow a line through the lower section of the carving.

Another pine that you might be interested in trying is western sugar pine. It has a clean tight grain and a distinctive sweet odor. You may need to shop around for this, but won’t be disappointed in the real deal. I carved this little eagle out of sugar pine and loved the experience.

A few words of caution on technique while using pine: it can seem like a good idea to try to “hog out” wood fast with a large gouge and a mallet. If you are hollowing the wings of an eagle for depth and shape, this can be a temptation. In fast grown pine, this is a mistake. Your gouge will tend to dig into the grain, and if you attempt to wedge it out, the grain will tear out deeply, leaving you with a rough and deep tear in the wood. Be gentle. Remember going fast is not always going to get you there sooner.
Another issue can be cuts that run on a bit further than intended. The answer to this is less force and more finesse on the cuts, If you are using a mallet switch to a lighter one or use your palm. Some years ago, I took a knot of elm from the firewood pile and fashioned it into a palm mallet. The palm mallet protects my hand from impacts while allowing me to get a bit more force into a cut.

A final observation is that much of the pine we get these days is very fast grown. I’ve found that in doing the finish work it’s not a bad idea to use some shellac to seal the wood for any light sanding you are going to do. Also, if the wood is extraordinarily soft the sealer will penetrate the end grain, and make the final finishing cuts easier and more precise. Remember, sharp tools will make your day.

Pine is a worthwhile wood for carving: It’s readily available in a variety of species; many times, it will be the economical choice of wood, and with sharp tools can yield a rewarding carving experience.

Stability

This is an update of a post I originally offered in March of 2018:

A while ago, I read an article in the New York Times on how artwork produced in the past seventy years was disintegrating rapidly. The deterioration was due to impermanent pigments, aging materials, and chemical conflicts between elements in a mixed media artwork. Some things were never meant to last forever, and others were never intended to be together in art.

 The issues were not only with modern works, but the majority were. There was an explosion of new pigments and media during the twentieth century. Plastics, acrylics, adhesives, fabrics could be added to art and have been. Regularly, I read about fading pigments, disintegrating substrates ( like paper, cardboard, or cloth), or adhesives failing. Little of the furor involves those who utilize wood as our main media. But let’s not get carried away with better than through sanctity. Woodworkers combine multiple materials too.

I create portraits of ships and boats, and yes, the major media is wood. But it gets complicated. Wide planks are expensive, hard to find, and due to wood movement and radial cracking, not so great a basis for carving a portrait. So, I construct blanks from multiple pieces of cherry to get the size I need for a portrait.

 I join individual wood panels with adhesives. Blanks are allowed to rest for a few weeks to ensure a stable construction. Then, when I get around to laying out the project and carving the boat or ship onto the cherry blank, I am sure it will not come apart. 

I may add bits of plastic, metals, bamboo, and other materials to represent equipment on board. Other adhesives hold those pieces to the carved portrait. After this is complete, we can add various pigments, carrier solutions, varnishes, and shellacs used to finish the portrait. Potentially, through the years, my work faces the same issues as other artists face. Most of my portrait work is younger than thirty years. There is plenty of time for trouble to catch up with me; will that super glue eventually react with that varnish?

The worst issues I’ve had have been with adhesives and varnishes. Early on, I used marine epoxies to glue up the blanks. Then, oblivious to the possibility that these joins might fail after curing, I proceeded with carving right away. 

The early failure of one or two blanks alerted me that something was wrong;

  • I checked the moisture content of the wood I use for the blanks, 
  • I carefully laid out the blanks and constructed their alignment to allow seasonal change. 

So, I didn’t think it was a matter of simple wood movement. The failures were along the segment lines of the blanks. A well-made glue line along the grain should generally be more robust than the surrounding wood. You usually want a bit of the glue to squeeze out of the joint as you clamp it, but if too much glue comes out, the joint becomes “starved” because not enough is left in the joint to create a strong bond. 

Using the marine epoxy, too much glue was coming out. But, it’s not apparent until a joint fails. I solved this by switching adhesives until I found what I wanted. None of the portraits are “in the wet,” although their surfaces might get damp, so an adhesive like a carpenter’s yellow glue is what I wound up using. It’s sturdy, resistant to moisture, leaves no visible glue line, and has a long history of use.

But trouble lurks all over the portrait – literally. I need to use marine varnishes to finish items that would go on to boats ( Quarter boards, billet heads, and transom eagles), but I can’t use those finishes on things like mast hoop portraits of vessels. Most marine varnishes have ultraviolet inhibitors that add their tint to a finish and change the color of painted objects. Silly me, I had to learn this lesson through experience.

 As part of the gallery connected with this post, I’ve included an early boat portrait that had a starved glue line and discoloration caused by varnish UV protection. It’s painful to fess up to your errors in judgment, but it is a learning process, and I include a shot of a similar portrait completed with a better approach. 

  Next on the list of potential bad boys are pigments. I do not like oil paints; I prefer acrylic. I’ve never had a problem with incompatibility between thoroughly dry acrylic paints and varnish. Still, as my technique developed, I began to use barrier coats between the colors and the varnish because not all problems showed up right away. A barrier can be as simple as shellac or something compounded and sold by the manufacturer of your pigments. If you create a commission for a client, adding a barrier is a worthwhile step. 

A friend who is a painter spent a good part of one evening convincing me that good quality pigments were not a luxury. Please do not use “craft” paints and expect something that has permanently vibrant color and that is chemically stable. I prefer the Liquitex brand, but you may prefer another. Established brands have websites that offer FAQs on their product. Remember, paint is not just one ingredient. It’s helpful to know about the pigments, the number of pigments binders, and the carrier medium involved. If it affects the long-term color fidelity of your project or its stability, you want to know.

I do rarely use styrene or other plastics without problems. I have used metal wire and small castings. I can’t remember using paper or fabric to date on any project. “To date,” I’ve had no issues; please remember that ‘to date” part of things. I keep my eyes open to what others experience, and my best advice is to be proactive use the internet to search out others’ experiences. When in doubt, remember two of my maxims! KISS – Keep it simple stupid. And, the seven P’s – proper prior planning prevents piss poor performance.

 With luck and forethought, we’ll avoid becoming some restorer’s headache. 

Curly

Smoothing curly grain or decoratively knotted wood can always be an issue in carving. Cabinet makers have tricks with scrapers and planes, but they generally are not working in the tight spaces that a carver has. This spoon was a particular issue. When I first made it, I didn’t notice the tiny stable knots in the wood. When I did see the knots, I thought to myself, ” when I smooth it down, it’ll look lovely.” Then it proved challenging to smooth, and I put the spoon to one side – too pretty to discard, but a finishing problem for another day.

Sometime in January, I saw these little flexible disc sanders demonstrated on the Treeline Woodworking* site and decided to try them. They are perfect for getting into tight spots that need smoothing. They are designed for use in Dremels, mini-carving motors, and flex shafts. Unlike some similar products, they seem to have just the right balance of stiffness and flexibility for working into the curves of a hollow like a spoon, small bowl, or an eagle’s feathers.

The completed spoon is now a Valentine’s Day present for my wife.

* I am not associated with Treeline or Mooreplastic.

Progress

The world of woodworking is full of handbooks, videos, manuals, and magazines that aver to show you the best way to do things.
Full disclosure time, my woodworking library has more than a handful of these in it. But it’s essential to be selective in your choice. If you are not careful, all you’ll be doing is allowing a publisher to separate you from the cha-ching in your bank account.

I advise sticking to texts that teach fundamental techniques rather than those which spout about twenty-five beautiful projects for the woodcarver.

Here’s my rationale. Unless those twenty-five projects advance your skills, they are of little use to your mastery. Also, projects can be traps if they are not presented with skill-building techniques. Cut here, file there, and paint this color gives you a chickadee or a Santa, but not skills related to carving other things as well. It’s a paint-by-the-numbers approach to craft. And as a result, any long-term value is lacking. So it’s my view that projects are a means to increase mastery, not an end in themselves.

If you’ve read my blog for a while, you might know that my 19th-century craft masters were users of patterns. But patterns are just the beginning point for a carver. I completed a dozen eagles from one basic pattern. Only the last looked anything like the master from which I carved it.

I varied the pattern and sketches for each eagle so you could tell the family resemblance but not much more. This was possible thanks to having the fundamental carving skills needed. Knowing how to alter feathers, the head, eyes, and body make each carving stand out individually.

In the beginning, it may seem unbelievable that you’ll turn away from project books. But if you master underlying skills, you will. First, an idea will come to you, and then you’ll begin analyzing it for the skills you’ll need to create it. Then, working through the planning process will force you to modify your idea and go back to your library to look at a particular skill or approach you’ll need. Eventually, a completed project all of your own will take shape.

Here’s some final advice. First, start keeping a journal book of ideas and thoughts on technique. Not all ideas will jell at one go, and some might take years. So keep the journal handy to add notes and sketches to the concept as they occur. Secondly, make art a habit. Visit exhibits, look at art from areas other than your specific interests, grow your interests, and your inspirations will grow as well.

Develop a mindset that a new project is a journey, not a one-time destination. After all, art and craft are lifetime occupations, and not everything gets accomplished at once.

Schooner

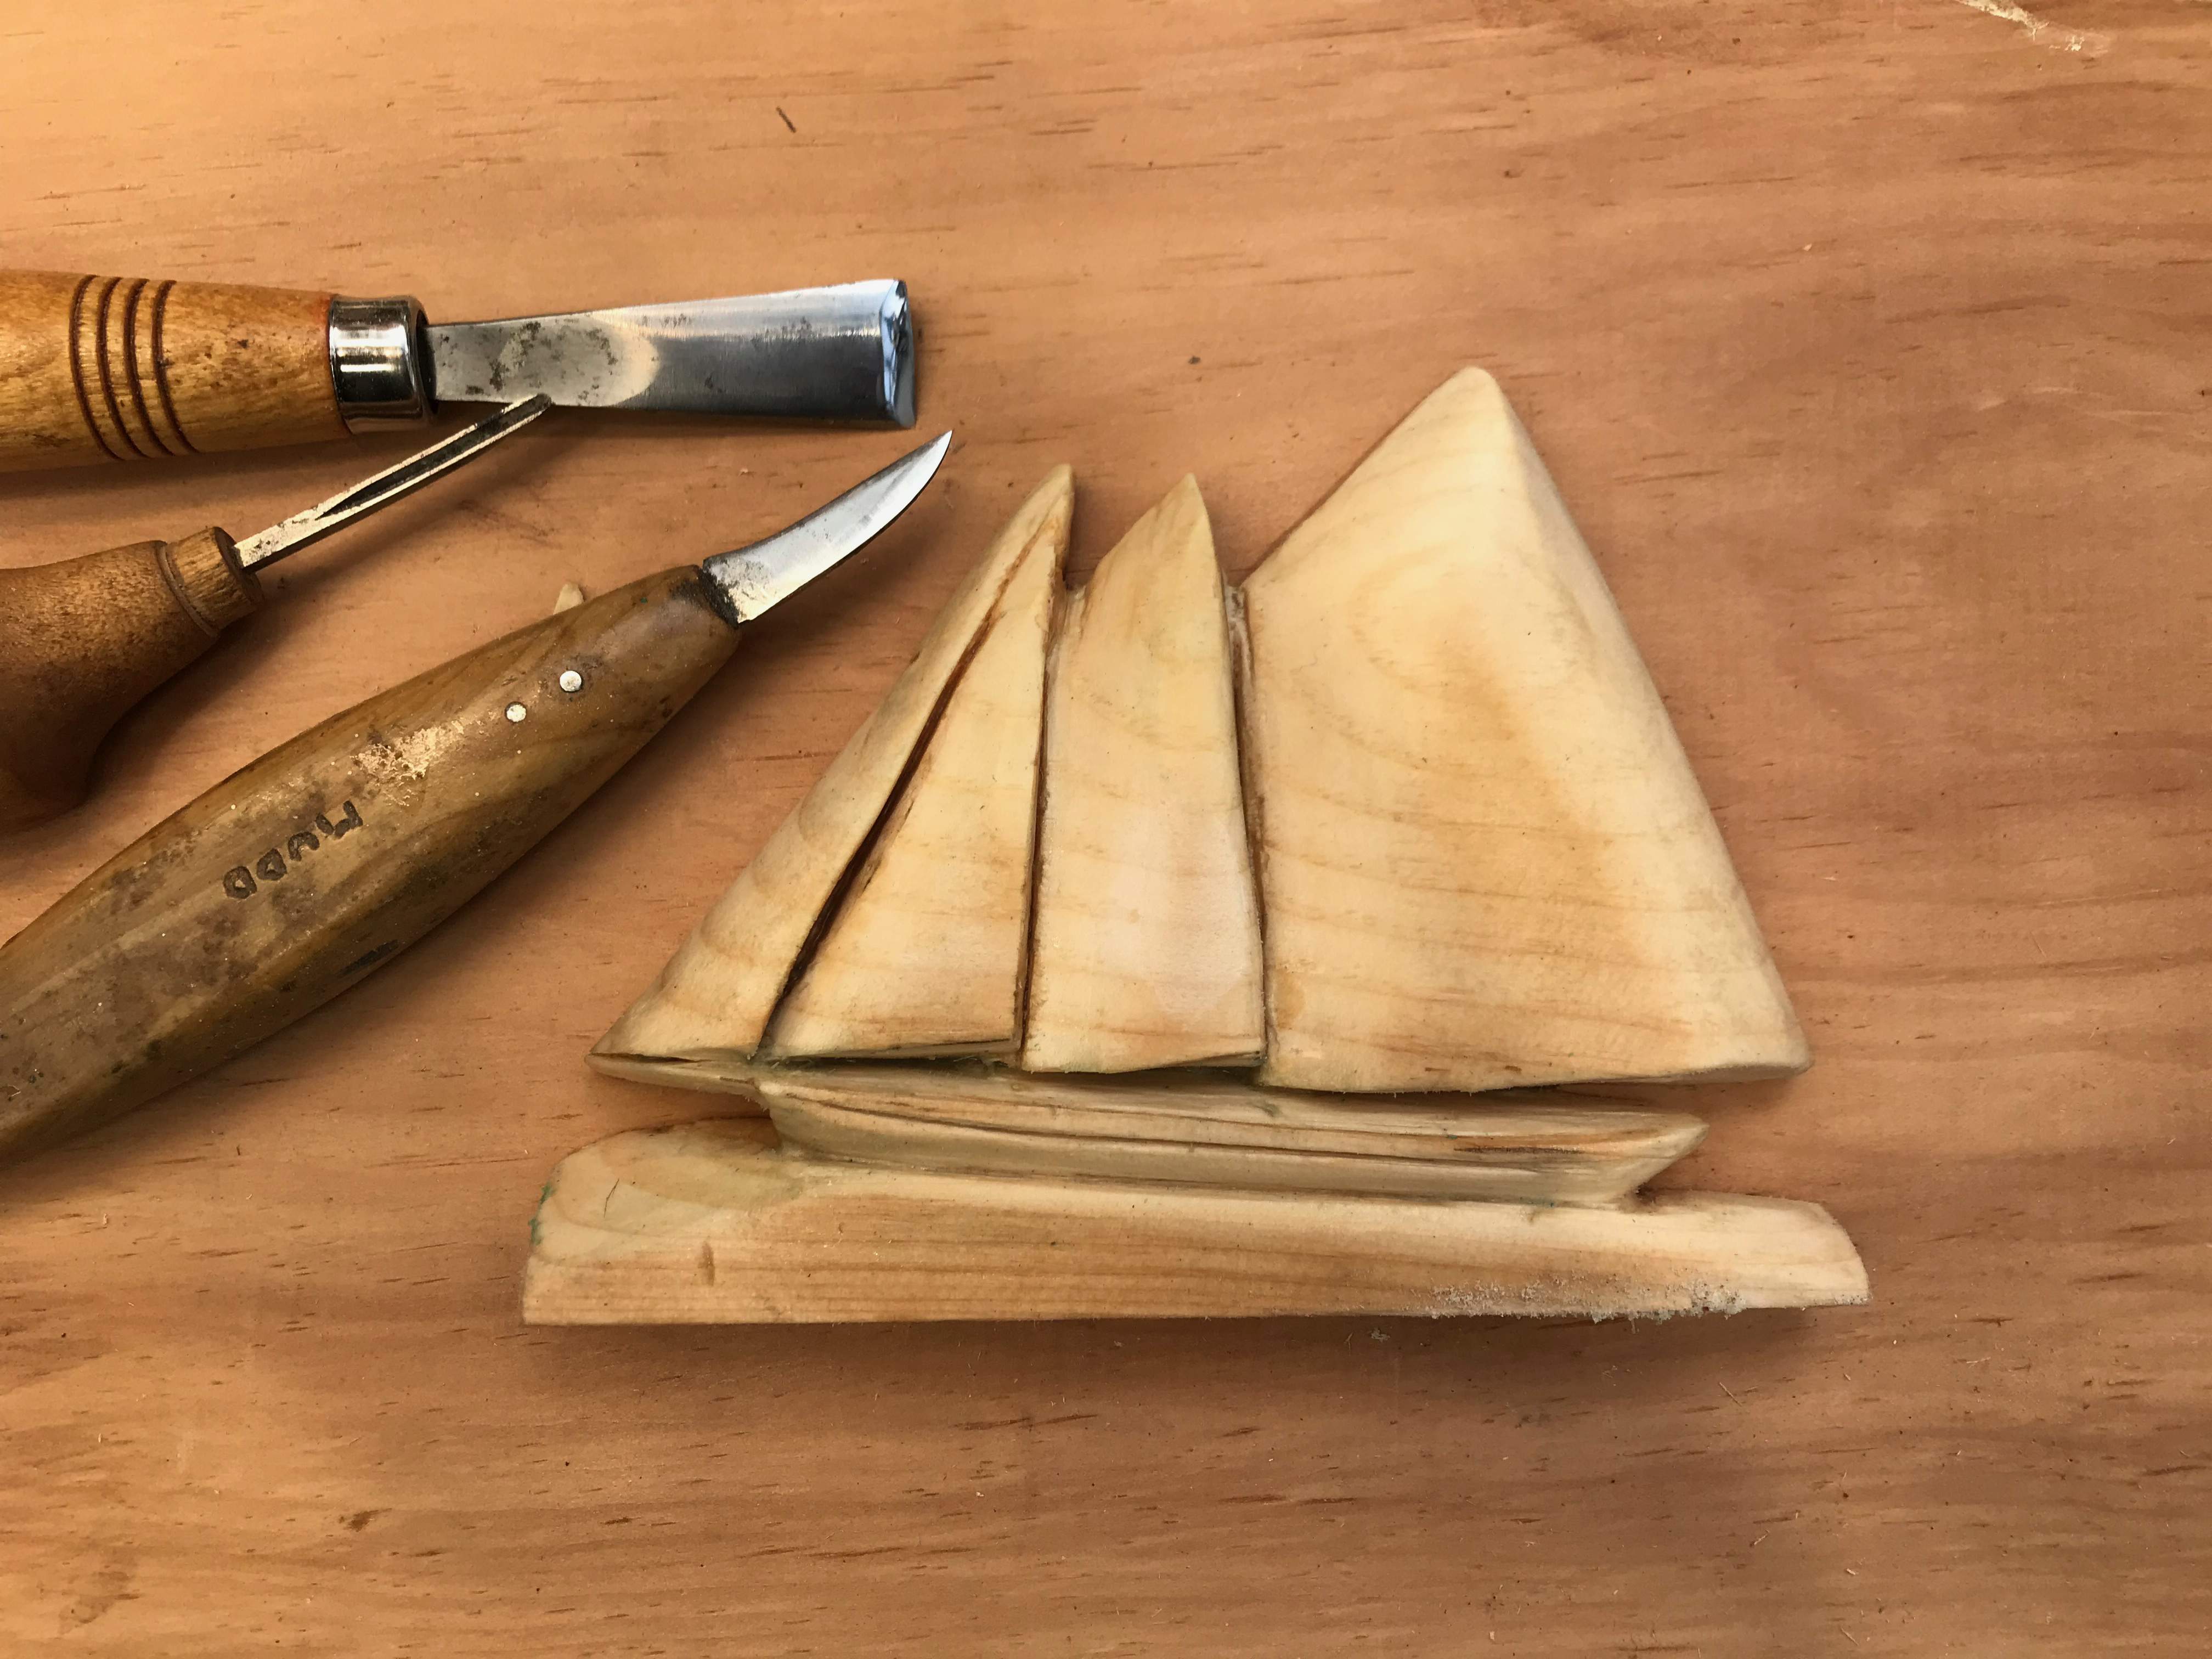
I posted on using cement on the end grain of a small schooner I was working on a while ago.
The logic was that this particular carving would have lots of unsupported end-grain prone to breakage while I was carving. The schooner is almost done now. And all that’s left to do is some final filing and sanding before I prime the wood for painting.
At the top of this post, you can see the prototype carving on top of a simple sign.

Unfortunately, despite my good intentions, I did have some damage, well concealed, to the jibs on this piece. After final sanding, the schooner will be primed and painted. Next, the bottom support piece will get mortised into the sign top and the ocean waves carved in and painted—more about that in the next post on this project.

The Fugitive Nature Of Art

One of my wife’s great grandfathers had been a successful chip carver in Vermont. He had even been mentioned in a contemporary book on artisans in that state. All this, as is often the case, was forgotten over the generations. About thirty years ago the elderly sisters who controlled the family estate began liquidating the old family homes and contents. Among the items that poured forth were carved pieces from grandfather. Like me, he sold the number ones and kept the number two’s as reminders of how to cut the patterns. One of these little boxes found its way to my wife. I was fortunate to receive a small book of designs that he regularly carved.
As a carver, my wife’s great grandfather was praised for the accuracy of his cuts, and the effortless nature of his carving (the photo I’m including is of one of his practice pieces; all that remains of his work as a carver).

Eventually, the cleaners reached the attic of his house. In the attic were the real reasons for his accuracy, and success at carving; Boxes and boxes of practice pieces. He had been a compulsive perfectionist in his craft and saved his failures as kindling for the woodstove. At the end of his life, the last five or six shoe boxes never made it to the stove and were consigned to the attic.

This post could end with an encouragement to practice for the sake of mastery – as Coveney put it the need to “sharpen your saw.” What you do often you do well. And, this is very true, but let’s take it just a bit further. One of my senseis in Iaido ( the Japanese art of drawing the sword) likes to talk about the “fugitive nature of the art.” It’s impermanent, use it or lose it. Try laying off a skill which depends on not just your intellect, but also the sort of muscle memory needed to cut accurately and the skill degrades. Don’t do it for long enough and while your brain may remember all the steps your body is cranky. Your muscle memory has degraded. This fugitive nature of the art holds true in sword work, in hand-carving, and I’d imagine in arts like dance.
We do not just achieve mastery once. We continue to reach for it through continued use because skill is fugitive.

%d bloggers like this: